How to use Your Smartphone To Create Quality Website Photos

Do you feel like you HAVE to use stock images because the only camera you have is your cell phone? Do you feel like you need tons of fancy equipment and a fancy camera to take great quality photos for your website?
Well ditch those defeating thoughts!
Years ago, cell phones did not have the greatest camera technology, but that’s not the case with the newer phones! Cell phone cameras have come a long way!
Plus, now there are additional lenses now you can add to your phone (but not necessity) and photo editing apps to use to create stunning cell phone pics. Don’t believe me? Check out www.pixoto.com. This is a photo sharing website, photo marketplace, and photo contest site. Anyways, my point is that you will be able to find stunning cell phone pictures that will prove to you that you CAN get awesome photos with your phone!
SO NOW YOU ARE PROBABLY ASKING, BUT HOW DO I TAKE GREAT PHOTOS?
I recommend starting with mastering lighting.
Lighting is a key element in great photos.
Lighting is a key element in great photos. It’s usually the biggest difference between a snapshot and quality, professional looking photo.
Since we are looking at using your cell phone, I recommend you start with a simple lighting setup.
Find a window or sliding glass door that offers a good amount of indirect light.
Obviously, the light coming in through a window is going to vary based on the time of day and direction it is facing. What we don’t want is light pouring in through a window causing a bright hotspot on your subject, but we do want the gentle light from coming in from outside.
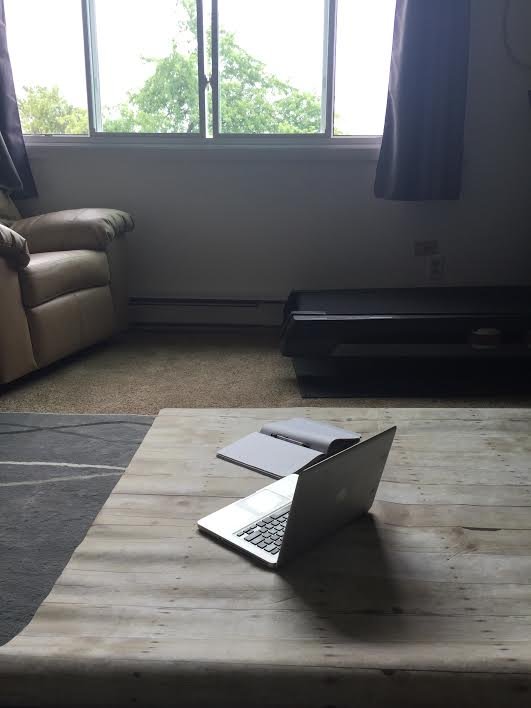
Above, you can see my setup near a window. I don’t personally have space to get a table close to my large window/light source, so as you can see, I set up near the window on the floor.
There’s no glaring light is hitting my setup, but there is beautiful, soft light illuminating the setup.Think of the light coming in from the window is gently kissing your subject not blinding them.
Now that you understand a basic no cost lighting setup, let’s go over some other great photography tips that will further improve your skills:
1. Clean the lens.
Remove scratched cases, dirt and dust. These problems will cause your photos to have spots and/or be blurry.
2. Change your perspective.
Get higher or lower than normal. The normal perspective is boring. Change it up!
3. Place focus on the main subject.
With the iPhone, tap your screen to select your main subject/object to set the focus on it. By setting the focus on a particular object this will make sure the subject will be is sharp which will help draw the eye of the viewer where you want it.
At this time you can also adjust the exposure, if needed, to brighten or darken the overall photo and mood by sliding your finger up to lighten it or down to darken it.

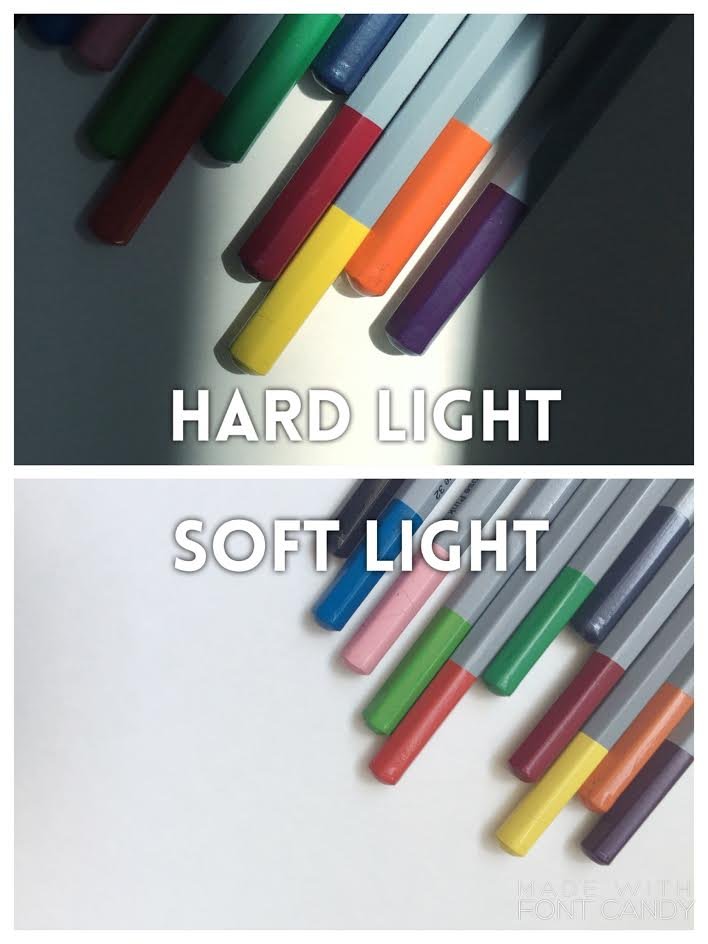
4. Don't use your camera's flash.
Good lighting is a key fundamental element in quality, professional looking photos. What's best is soft light which is obtained from indirect window light, modified/filtered light through a lighting modifier or naturally filtered by the clouds on a cloudy day.
5. Make your photo stand out.
For general photo editing, the Apple App Store and Google Play both offer Google’s FREE photo editing app called Snapseed. If you want to add additional creative elements you can make it stand out beyond a great photo with apps that can remove distracting elements, create the blurry background look, add textures or different colors or fonts with apps such as Retouch, After Focus, Mextures and Font Candy.
Below are just a few of the options for making adjustments inside Snapseed.


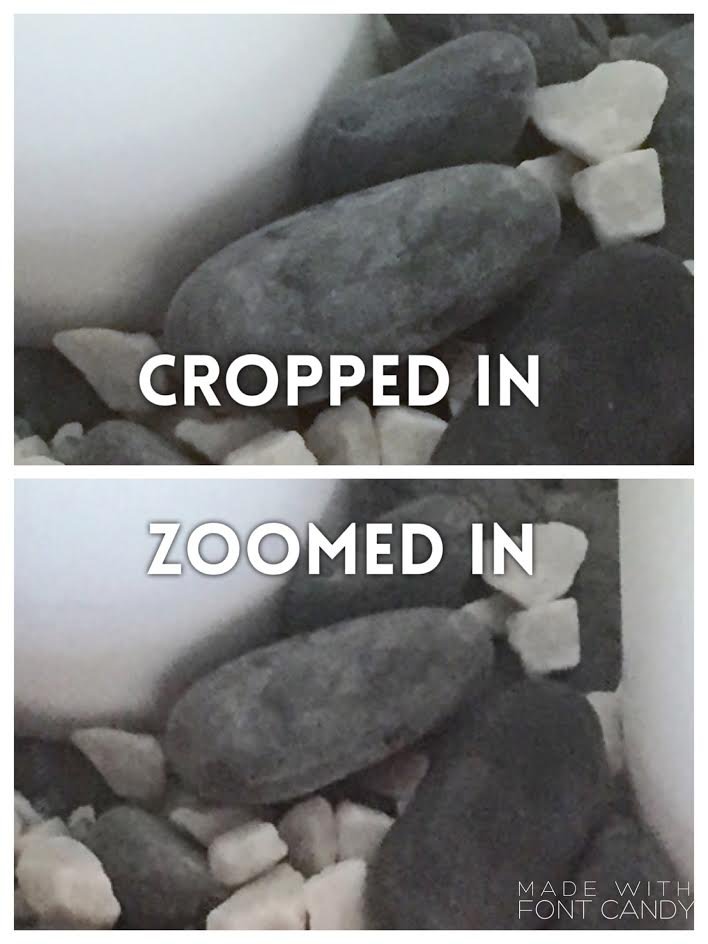
6. Don't zoom in; crop in.
If you zoom in while taking the picture, your camera is digitally enhancing it for the changes. While both methods makes the image look larger and closer, it also ends up becoming more grainy and pixelated looking. Instead, take the picture as is and then use the photo editing software or your phone's own editing program to crop in closer. This will achieve the same look without the grainy, pixelated look, and you'll end up with a more professional, high quality look to your photos. Can you see the difference below?
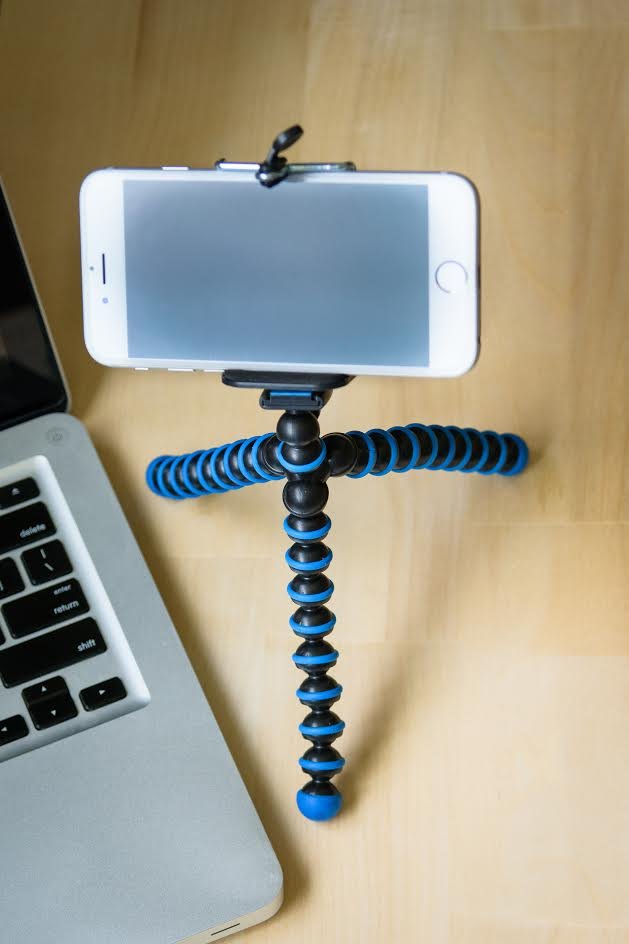
7. Avoid camera shake and picture blur.
The easiest way to avoid camera shake is to get a tripod. There are several types out there for camera phones including some with rigid legs, adjustable legs, short ones and tall ones. I have the Peyou 3 in 1 Octopus Style Adjustable Tripod with remote shutter button. One nice feature is that I can wrap the legs around something if I needed, or stand it up on a surface. They are inexpensive and typically helpful, but sometimes a tripod just won't position the phone correctly. Other ways to avoid camera shake is to hold the camera with both hands, hold your breathe when you press the shutter button, hold the camera close to your body, and/or use the volume button on your earbuds to activate the shutter button.
8. Make the photo interesting.
Add items relevant to you blog post's topic. Add textures to help create depth and shadows. Remove or avoid distracting elements in the frame or background.
9. Consider it your blog’s overall look.
What is the mood or feeling? What are your blog's color scheme? Remain consistent with your blog's style so they all portray the same look and feel, even if the pictures are completely different. Another great idea, is to look through stock photo sites or blogs for inspiration and then mimic the photo putting your own spin on it. I do NOT recommend copying the exact photo.
10. Practice makes perfect.
The more angles and different things you try, the more you'll get the hang of it and will take great photos. Also, rearrange the objects in the photo and take many, slightly different pictures. With digital media it doesn't matter how many you take, just delete what you don't like!
I went over several important aspects to taking better cell phone photos, so you may want to bookmark or print this page, so you can refer back to it next time you take your phone out for pictures.
If you have any questions feel free to send me an email at [email protected], and I'd be happy to get back to you with an answer!
For more information, tips and tutorials, please head over to www.LearnBlogPhotography.com and sign up for the newsletter.

GUEST POSTER: AMY JACKSON

Amy Jackson the owner of www.LearnBlogPhotography.com and www.AmyParisPhotography.com. Her passion and mission at Learn Blog Photography is to teach female entrepreneurs and bloggers how to take quality website photos with their cell phone so they can save money and have a professional, unified look. Connect with Amy and the other Blogpraphers in her Private Facebook Group at www.Facebook.com/groups/LearnBlogPhotography.com. Amy specializes in Senior High School and Family photography.