10 Website Tweaks to Make to Increase your Email List Subscribers

List building is one of the most important parts of running a successful online business.
I don't know about you, but I feel like I'm constantly chasing my tail, trying to implement the latest 'fad' in email marketing, and not getting much traction from any of them. In reality, there are simple, consistent strategies you can do to increase email subscribers, but it all starts with your website.
I was surprised by just how much of a difference small, simple tweaks on my website could make to building my list.
Since implementing tweak #1, I've seen a 10% increase in subscribers, just from doing this one thing. And implementing tweak #7, has increased conversions from my sidebar by 20%. So just between these two tweaks, I've increased conversions by 30%. Not bad at all.
If you don't wanna keep chasing your tail and you want to make your website work for you and convert visitors into subscribers, then stick around, 'cause I'm about to drop some knowledge-bombs on y'all!
>> P.S. This post comes with an awesome freebie that you can download HERE or by clicking the button below! <<
#2: Clickable Header aka Feature Box
Turn your header into a feature box that encourages people to join your email list. This is dependent a lot on your theme or what plugins you have access to.
If you have LeadPages, this is an easy implementation. There are a lot of high-profile bloggers using this feature, including Melyssa Griffin.
Here are a couple of examples of what I'm talking about:


These are both designed with LeadPages. This can be a costly option, so it pays to check out what your theme offers.
Another way around this is to use the Welcome Mat feature from the Sumome plugin.
You can choose to have this switched to display always, but this could turn some people way, as they literally have to subscribe to access your content.
Another option would be to use a plugin like Optinmonster and install a single line box below your header instead.

This option really comes down to personal preference and personally, I've tried the Welcome Mat feature from Sumome, but found it annoying to most visitors, particularly when they are looking for your content.
Try it and see if one of these options works for you.
#3: Popup Based on Intent
There are plenty of posts around the web saying how annoying popups are, but even though they might be annoying, they do convert. The numbers don't lie on this. They work.
The Sumome plugin provides a great popup option called List Builder. You can choose when it popups, up so that you're not annoying people and you can also choose to have it on mobile or not (I generally opt for not on mobile, even more, annoying there!).
LeadPages also provides this as part of their paid model, Optinmonster too.
If you're using Mailchimp or ConvertKit, both of these email providers also give you this as an option, although you may need to tinker in the HTML to do this.
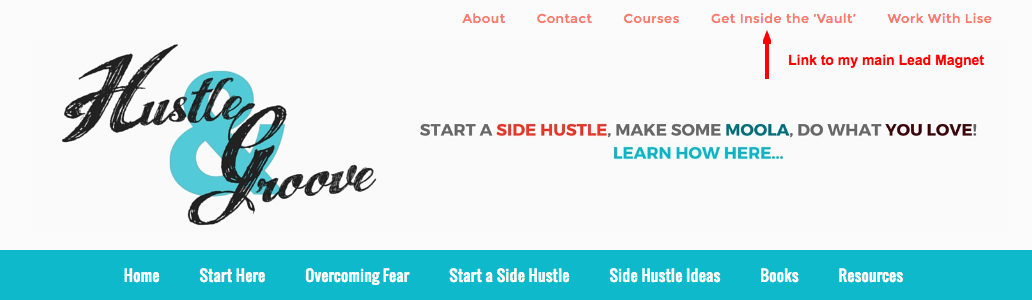
Melyssa Griffin also has this on her site (hint: this is where I got it from!).

If you don't want to create a new menu, then add it to your existing main menu as well. I just like the top menu, as it seems to convert better.

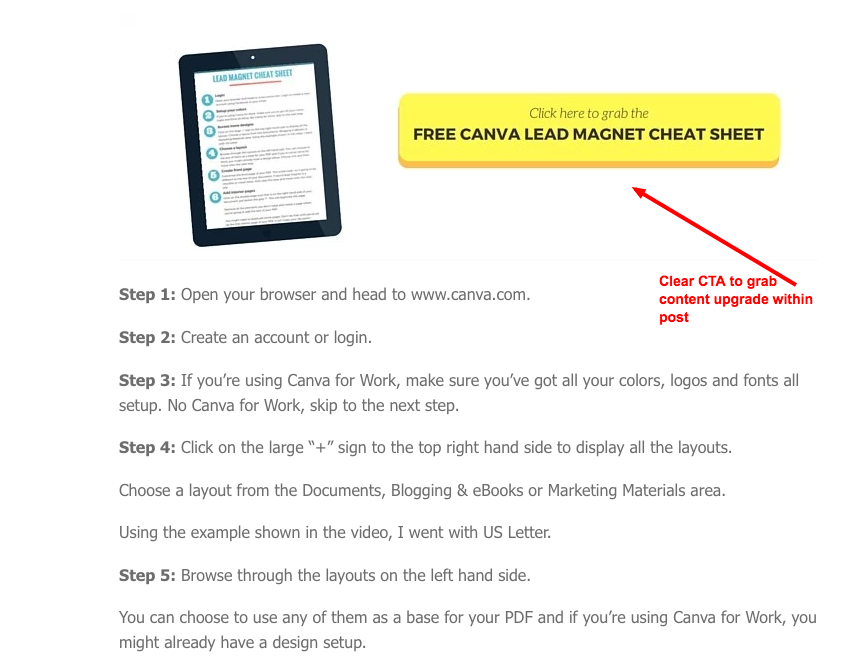
#6: Make CTA Buttons Interactive
If you send your new visitors to a landing page to opt-in, consider trying an interactive call to action button.

You can do this by adding a border around the button, as seen in the image below. To do this, you'll need to make some changes to your CSS files and also need a bit of HTML code, all of which you can get from this article that tells you how to do it.
These are some pretty impressive opt-in rates, so it's definitely worth a try.
#7: Sticky Sidebar
Have you ever noticed that when you visit a blog, as you're scrolling, the sidebar seems to stay with you? My super technical term for that is a 'sticky' sidebar and it's extremely effective if you want to highlight just one or two items.
I've been using this on my website for just over four weeks now and I'm super impressed by the conversion rates. Conversions have increased by 20% from my sidebar, all because I implemented the sticky strategy.
To do this, you need a special plugin. It's called "Q2W3 Fixed Widget" — it's only available for WordPress and it will change your life.
You can see it in action on my blog, www.hustleandgroove.com — I'm promoting one of my main lead magnets and my course, which you can see below.

The key to this plugin working effectively is to have no more than 3 sticky widgets in that sidebar. Any more than that and it's too much for your visitors and they won't take any action.
#8: Add Opt-in to Contact Page/About Page
This is a simple tweak to make to your site — add your opt-in form to your contact page and about page.
You may as well make the most of the website real estate you have, right? Using your email service provider plugin, add your opt-in box. You can also do this with plugins like Optinmonster or LeadPages.
If you've got a resource library, this is a great opt-in to display on these two pages. Otherwise, simply choose the lead magnet that makes the most sense, or promote your webinars or Twitter chats.
Whatever you want to get eyeballs on, add your opt-in to these pages. If you're not sure if people are clicking on these pages, enable the "heat map" on the Sumome plugin, let it run for a few days, and then check to see if people are clicking on those pages.
Don't forget to enable the heat map on those two pages as well, they aren't enabled by default, you have to do this manually. Watch this quick tutorial video on how to enable the heat map option in Sumome.
#9: Add CTA on Hub Pages
This is another relatively quick tweak that will increase email subscribers and also provide you with some great SEO juice. Hub pages are also called pillar content. Sites like Copyblogger and Backlinko do this really well.
Basically, a hub page is a page that is about one of the main topics you cover on your site. Inside this page, you'd link to all the content you have that deals with that topic. Think of it as an online guide or index page to some of your best, free content.
Within this page, add an opt-in box as well, preferably to something that matches the topic of your hub page.
Some examples include 'start here' pages and 'resource' pages. I have both these pages on my website and have included opt-in boxes to my 7-day challenge, rather than my resource library.
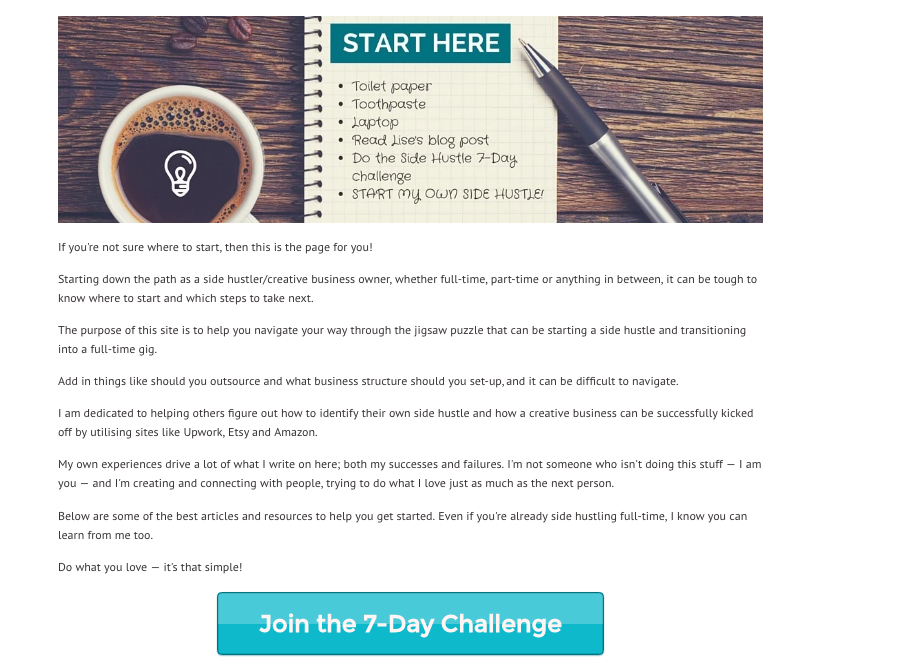
These pages don't take long to set up if you already have the content :-)
#10: Add Opt-in to Comment Box
I think this is one of the most powerful tweaks you can make to your website — adding your opt-in to your commenting area.
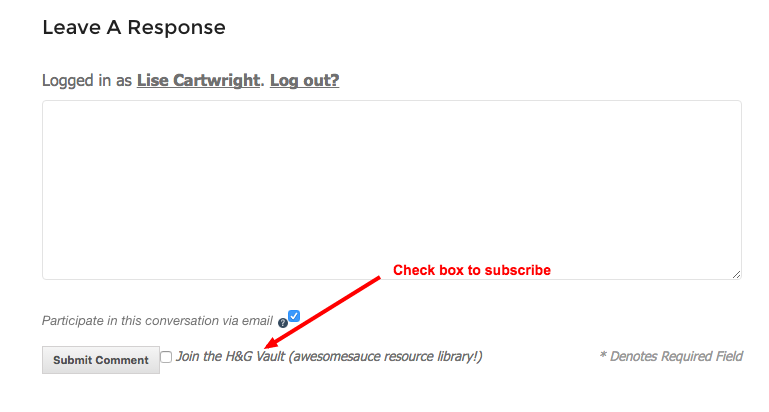
You may as well grab subscribers here too, especially as these people are engaged enough to leave a comment, you want to make sure they're on your email list too. WordPress doesn't give you too many options, which is why utilizing plugins is your best option. This article here goes into detail on how to add your opt-in using Mailchimp, Aweber, and Jetpack for WordPress.
If you're using ConvertKit like me, then you can do this by installing the Newsletter Sign-Up plugin.
Watch the video on how to do this on your site.
Now, all that's left to do is implement one or more of these tweaks on your own website and begin converting those visitors into subscribers!
Guest Post by: Lise Cartwright

Author Bio: Lise Cartwright is a Freelance Writer, Full-Time Author, and Coach who’s on a mission to help awesome women be successful in their side hustle or creative business utilizing sites like Upwork, Fiverr, Etsy and Amazon. You can connect with her on Pinterest and Twitter, where she shares even more strategies.
